Showing posts with label Jayne Leitao. Show all posts
Showing posts with label Jayne Leitao. Show all posts
Thursday, 29 March 2012

Evaluation Question 5
We used a multitude of ways to reach our target audience. On top of the cinema screening that was provided by the college, we have posted our video to sites such as Facebook and Vimeo, helping us to display it to a wider audience and also get helpful feedback. This was useful because a large group of internet users are our target audience (males aged 19-26).




Monday, 26 March 2012
Target audiences
Every piece of entertainment has a target audience. A target audience is the type of social group that the piece - for example a film - is trying to reach. An example of a target audience would be a "family film", which is a type of movie that has a non-complex plot line and happy scenes with a positive message. The target audience is family, which is classified as parents with children.

Alternatively, an R rated film (or A/18 in the U.K) would be a gory film, with high levels of violence, sexual, drug-related and explicit language. The target audience would be a "mature" audience, which means anything from young adults to an older audience.
Some types of movies have genres that make the target audience difficult to define. Target audiences are usually created through how the themes/characters and genres in a movie relate directly to a section of society. When a romance movie set in high school is made, it may have various elements of a sexual nature, in some examples even low level gore (e.g mean girls) and thus making it difficult to define the genre hence target audience, and so one must look to the characters and assume that being in a high school, the target audience would be teenagers, perhaps late-teens due to the horror content etc.
Because of this, our film, LUCID, made defining a target audience difficult, as our genre was thriller with a sub genre of action, and so we had to assume that due to the gory-horror aspect, young adults, especially males, would be the main target audience for LUCID.
The differences between genre and sub-genre.
Genre is the theme or type of a piece of media, ie. a book or film etc. Genre is the main and most obvious one of these. Some examples of genres are horror, comedy, romance etc. Everything has a genre.
As the name suggests, a sub-genre is a secondary genre, that is generally less obvious but still has themes and ideas in the piece of media.

For example, a film might be an action film primarily, but there are scenes of horror or gore. A popular film series that has the genre of action but a sub genre of horror is the Resident Evil series, which revolve around a zombie apocalypse, and the main character, ALICE, saving the world from these zombies whilst sorting out her own troubles. The action involved in killing large numbers of enemies is all gun-scene fighting and special effects, and as this is the main part of the movie, the genre is action. However, because many scene have zombies eating people, and there are high levels of gore because of this, the sub-genre has been classified as horror.
In this way, all movies have a main and sub-genre, because it is difficult to make a movie with only one theme.
As the name suggests, a sub-genre is a secondary genre, that is generally less obvious but still has themes and ideas in the piece of media.

For example, a film might be an action film primarily, but there are scenes of horror or gore. A popular film series that has the genre of action but a sub genre of horror is the Resident Evil series, which revolve around a zombie apocalypse, and the main character, ALICE, saving the world from these zombies whilst sorting out her own troubles. The action involved in killing large numbers of enemies is all gun-scene fighting and special effects, and as this is the main part of the movie, the genre is action. However, because many scene have zombies eating people, and there are high levels of gore because of this, the sub-genre has been classified as horror.
In this way, all movies have a main and sub-genre, because it is difficult to make a movie with only one theme.
Health and Safety
There are many health and safety rules when filming, using equipment, and just being overall careful.
1. Use a tripod when possible
Using a tripod is important, because the camera can often get too heavy to hold, and while the tripod is mainly used for keep shots steady, it's also safer to use a tripod, as long as it is out of the way of people and balanced correctly.
2. Do not have food or liquids around any equipment.
Besides the fact that the equipment is expensive, and food and liquids will most likely damage the equipment, having any fluids etc. around electronics is dangerous, and puts everyone around in danger of electrocution etc.
3. If you break equipment, you must pay for it.
The equipment is very expensive, and breaking it will cost. The cameras are typically around 1.5 thousand pounds, which is a lot of money in exchange for being careless which could have been avoiding by being a little bit more aware.
4. Always take a spare battery.
The last thing that someone who is filming wants, is to be right in the middle of an excellent shot, and then the battery goes dead and there is no alternative. Be sure to take a spare battery - better safe than sorry.
5. Put equipment away properly.
Lots of the equipment is heavy, and if it falls, it could seriously injure someone. When putting away the camera or tripod, be sure that the carrier and cases are zipped up and closed properly, so that it doesn't hurt someone who picks it up, thinking that nothing will fall out.
1. Use a tripod when possible
Using a tripod is important, because the camera can often get too heavy to hold, and while the tripod is mainly used for keep shots steady, it's also safer to use a tripod, as long as it is out of the way of people and balanced correctly.
2. Do not have food or liquids around any equipment.
Besides the fact that the equipment is expensive, and food and liquids will most likely damage the equipment, having any fluids etc. around electronics is dangerous, and puts everyone around in danger of electrocution etc.
3. If you break equipment, you must pay for it.
The equipment is very expensive, and breaking it will cost. The cameras are typically around 1.5 thousand pounds, which is a lot of money in exchange for being careless which could have been avoiding by being a little bit more aware.
4. Always take a spare battery.
The last thing that someone who is filming wants, is to be right in the middle of an excellent shot, and then the battery goes dead and there is no alternative. Be sure to take a spare battery - better safe than sorry.
5. Put equipment away properly.
Lots of the equipment is heavy, and if it falls, it could seriously injure someone. When putting away the camera or tripod, be sure that the carrier and cases are zipped up and closed properly, so that it doesn't hurt someone who picks it up, thinking that nothing will fall out.
Art of the Title Sequence
28 weeks later - Traditional Film Opening.
28 weeks later is a film that opens with a traditional opening. I enjoyed this film, as I saw it on T.V. When I first went to watch it, I wasn't planning on doing so, as I just stumbled upon it. The opening successfully pulled me, as a viewer, in to the movie.
It follows the conventions of a traditional openings because the clips are longer in length and the titles separate the clips, while some are on top of the action. The camera angles are also straight on, rather than at various positions as in stylised openings.
The music in the opening isn't very complex but adds enough to enhance the mood and set up the thriller movie. The editing is mostly between the titles and the clips, and the mise en scene clearly shows the viewer that the movie will be a thriller.
The lighting is dark to accompany the music and mise en scene in setting the mood as a thriller so that the viewer will be expecting what they're going to see, and as in my case when I first began to watch the film, the mixture of these elements made it intriguing and interesting, causing me to want to continue watching the movie, and showing that a traditional film opening for this movie succeeded in attracting it's audience through the art of title sequence.
Conventions of film openings
Film openings are used to introduce the film to the viewer, and to make the viewer want to continue watching. Film openings are also used for the opening credits, to introduce the director, actors, production company etc. which also pull in the viewer, as the titles may be of actors that the viewer likes and so on.
There are four main openings:


In our opening, LUCID, we decided to use a traditional opening, with a slightly stylised effect.
There are four main openings:
Traditional:

Films such as "The Stepfather" are a traditional film opening. They encompass scenes that last about 7-10 seconds each, split up by the film titles. It starts the story line, which will be normal (as if the movie were playing), broken up by the titles.
Discrete:

Discrete openings are the black horse of openings, as they are peculiar and the most difficult type of opening to shoot. They include short scenes of only a few seconds, with the titles over the clips, and the story line of the opening is unknown and difficult to figure out. It draws in the audience by enticing them to try and understand what is going on, and the quick clips are action-packed and interesting. Such can be seen in the opening of "Enemy of the State"
Stylised:

Stylised openings are a way for the director to translate his personal touches to the opening, such as in "Mesrine". Stylised can include a mixture of all the openings, or something completely different, depending on what the director chooses to show in the opening. They fit no exact trend and can never be generically described.
Titles over a blank screen:

This speaks for itself. The famous thriller "Psycho" has titles over a blank screen. These are usually frowned upon, because they do not pull the audience in at all.
Monday, 12 March 2012
Friday, 9 March 2012
First day of filming - on set pictures


Above are some on set pictures that we took on our first day of filming before we actually started to shoot. As you can see the first 4 shots are of the interior rooms that we are going to use such as the kitchen, work surfaces and the corridor and also the exterior of the back garden which we are going to film the killing scene in. Taking these pictures helps us to plan out where we are going to place the characters and the props ect. We will be able to dictate where we want to put things by looking at these pictures. We are happy with our chosen set as it has all the things that we wanted to have such as the dining table, work surfaces and then garden area.
Thursday, 1 March 2012
LUCID Rough Cut
Above you will see the rough cut of our opening to our film LUCID. Here we have briefly strung the footage together in the correct order we would like it to flow in. We have not used any effects or titles on it yet which we will add soon. We also need to finish composing our music which we will lay on top of the footage so it will create intrigue and suspense. Currently there is not much suspense built here as this is just the footage following simply and with the music played over this it will build the suspense and make it much more dramatic. So far we believe that our work is panning out well as we have got all the relevant footage we need so we do not need to film anymore because all the footage is fine how it is. When we filmed we spent a lot of time taking many shots so that when we came to editing we had more choice of footage to play with. This was a good thing to do as now we have got great footage with good camera shots and angels that we have been able to use to make this rough cut of our film opening.
Monday, 27 February 2012
Final Project Editing
Today in class we have started the editing of our final project for our opening Lucid. We are using Final Cut Pro to edit our work and we have taken some screen shots of us editing. Our editing is a slow pace as the camera work was handheld so the shots are quite long therefore the editing does not have many cuts in some sequence. The effects that we have added at this point are quite basic such as dissolve in and fade out because we are trying to focus on creating a good sequence first before adding more effects. We have used cross cutting at the end of the sequence so we can alternate between two scenes of the killing and of the man writing the information down. To establish the location we used various different shots of the front of the house in order to set the scene for the audience.


The screen shots above are the ones that we have taken while we have started editing, in the first screen shot you can see a shot of the location where the story is taking place. This looks like an ordinary house from the outside which may lead the audience to believe that an ordinary person lives there which they will soon be shown that this is not true. The second screen shot is of all the thumbnails of the footage that we have taken, we had a lot of footage to choose from but we have chosen the best ones to use in our editing. The final screen shot featured here is of the main character (Mark) acting, it is important to introduce the main character here in the opening sequence so the audience can get to know the character and know from who's perspective the film will revolve around. Overall we believe that it is very important to take screen shots of our work so we can document what we do incase we need to look back for future reference.
ADDING TITLES


We have know begun to add titles to our film opening while we are editing. We have continued to use Final Cut Pro throughout our whole editing which has been good for our group because we have all learnt about how to use the program. In the first screen shot you can see the title of the film, "LUCID" appear in big clear black font over a white wall. The whiteness here reflects the innocence of the characters however the black font on top also reflects the dark acts the man commits. In the second screen shot we see Mark coming through the font door and we then see his name appear next to him as he walks through. This is a good timing to put the actors name in as we can see who the actor protrays in this film so we can be clear in our heads about this.
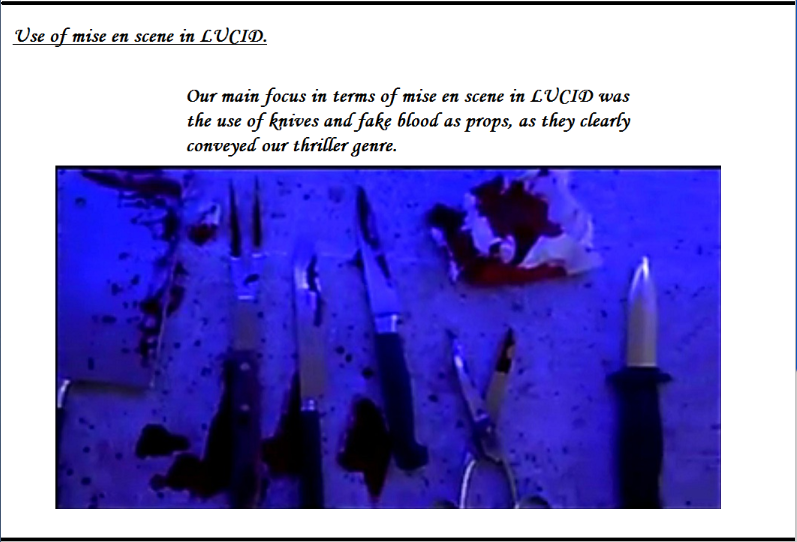
The third screen shot shows the titles that say "An Amber Ryder Production" over the as shot of all the bloody knives layed out across the kitchen counter. It is very important to feature the production company/ producers in the title sequence as these are very important for the making of the film. The whiteness of the font here sits nicely against the blue back ground which makes it stand out clearly.
In the final screen shot we see the killer holding the knife beginning to walk towards the lady to kill her and here the directors name appears on the right hand side. Again we use the white clear font that we have used for all the other titles. The directors name appears here because the most important scene is about to take place and the director is the most important person for the creation of any film.
We have now finished putting on the titles which means that we have finished our editing. The editing was a fun process although it could be quite tedious at times because it takes a lot of effort to make it perfect. Due to the fact that we took numrous amounts of footage whilst filming, this meant that we had lots and lots of footage to play with while editing which gave us a good advantage because we could chose the very best clips that we had so we didnt have to go and film anymore.
Editing was a fun process and with the hard work from some group members we were able to get it done on time.
Monday, 20 February 2012
Getting prepared
Here is an old facebook conversation between Amber and I about getting the props ready for filming.

Monday, 13 February 2012
Editing of the prelim.
To edit our opening we had a couple of training lessons using "Final Cut pro"


This is the program that we will be using to edit our final project. To see our footage and finally edit it we have to follow some steps. First we have to import the shots from the memory card to the video drive through final cut pro then we choose our favourites shots from the video drive and we drag them into the timeline of final cut.
 |
| Time line |
 | |||
| Importing files |
After we having our shots in the timeline this would be call "sequence 1". We can manipulate sequence 1 as we want, cutting shots and adding some effects to make look the sequence nicer.
As we are getting familiar with the program and the tools we can add titles as well looking forward for a more professional final cut.
 | |||
| Adding titles |
To add tittles we look for a big "A" below the screen were the shots are being projected, then we choose the "text" option and then we write what we want; we can change the font the size and the colours.
The text will going to be in the timeline on the shot that we want it to appear. To drag the titles into the timeline we have to be careful and be aware of the arrow direction, if the arrow is pointing to the right it will move the whole sequence so we want the arrow pointing down to make the tittles appear on the shot that we want.
Preliminary Excercise.
On the 23 rd of January 2012 our media studies teacher Daniel Lowe introduced us into what was called a preliminary exercise, within this lesson we had to film a sequence about “ a character opens a door, walks into a room, sits down opposite another character and they share a few lines of dialogue”, at the same time while filming this sequence we were given rules:
 One of the first things we need to cover in making a movie is orientating the viewer, once you establish the scene, you have technically established the 180 degree rule for example if there are two people sitting opposite each other talking, then the viewer can easily establish were the man is sitting either on the left or the right and were the women is sitting, so anytime the camera shows these two people the man should be on the side he supposed to be ( left or right) and also were the women is positioned( left or right). When the camera is place above their heads the placement of the camera can only go on the line that should be straight with both ends opposite each other meaning 180 degrees.

The plot
1. Make sure you use at least one match cut, which makes the action appear more seamless, time is meant to be continues.
2. An example of a reverse shot, cuts from one person speaking to another, this is very useful in our sequence as it consist of a dialogue.
3. Show your understanding of the 180 degree rule,
What is the 180 degree rule?
 One of the first things we need to cover in making a movie is orientating the viewer, once you establish the scene, you have technically established the 180 degree rule for example if there are two people sitting opposite each other talking, then the viewer can easily establish were the man is sitting either on the left or the right and were the women is sitting, so anytime the camera shows these two people the man should be on the side he supposed to be ( left or right) and also were the women is positioned( left or right). When the camera is place above their heads the placement of the camera can only go on the line that should be straight with both ends opposite each other meaning 180 degrees.
Within the task that we were set to do we had to figure what type of style our thriller should be and we were given options, it was either psychological, supernatural or action , and my group decided to choose supernatural to emphasise unearthly, weird and the miraculous events to come. To plan our prelim film, we had to use story boards of our sequence then make it into a short “dramatic storyboard”, this was a bit difficult as group 6 are all terrible drawers but we got there in the end. Once the storyboard was out of the way then starting filming, we had to film quiet a number of times because I found it difficult to stop laughing.

The plot
Well our thriller is called paranoia and stars(Gustavo, mark and amber) and is about a young man who is paranoid , he hears “voices “ in his head and feel like someone is “ chasing him” and tries to seek help, form a professional before things start to escalate.
Opening Plot
The plot of our film "LUCID" is about a killer who has a peculiar way of organising his life, and thus his kills. The title is called LUCID because it is ironic - lucid means when something is clear and easily understandable, but the killer's coding and organisation seems complex and confusing, however for him it makes perfect sense.
The storyline follows the reasons for his madness. Every so often he receives a text with an alphanumeric code, which he then writes down on a sticky note and pastes on his wall. The viewer can see that there are many notes already on his will, crossed out in blood, which leaves the suspicion that he has done this before. To raise this suspicion, there is a line of various "murder tools" that are covered in blood in his kitchen.
The scene opens with the killer outside, covered in blood with a bloody knife in his hand. He seems angry, so the viewer can assume he has just killed someone. He then returns home, and takes off his shirt, putting it in a bin bag that has obviously been placed there in advance. He then moves over to the sink where there are knives soaking in a bowl and drops the bloody knife in. The water turns red as the blood comes off. The killer wipes the blood on his hands off onto a sticky note on the wall in front of him. He leans over the sink, showing he is tired. Suddenly, a loud buzz is heard and he looks around. A phone is vibrating on the table. He goes over and picks it up, looking at the message he just received. He then sits down, and begins to decode the message onto a new sticky note. The message reads "Sarah Williams". He then puts it up on his wall. The scene then jumps to a woman doing her gardening. All of a sudden, the killer appears, and kills her. He returns home, and the scene somewhat repeats itself.
Although it seems long, when condensed, the film time should not be too much. We may cut some things to shorten the scene. We'll have to see when we get to editing.
The storyline follows the reasons for his madness. Every so often he receives a text with an alphanumeric code, which he then writes down on a sticky note and pastes on his wall. The viewer can see that there are many notes already on his will, crossed out in blood, which leaves the suspicion that he has done this before. To raise this suspicion, there is a line of various "murder tools" that are covered in blood in his kitchen.
The scene opens with the killer outside, covered in blood with a bloody knife in his hand. He seems angry, so the viewer can assume he has just killed someone. He then returns home, and takes off his shirt, putting it in a bin bag that has obviously been placed there in advance. He then moves over to the sink where there are knives soaking in a bowl and drops the bloody knife in. The water turns red as the blood comes off. The killer wipes the blood on his hands off onto a sticky note on the wall in front of him. He leans over the sink, showing he is tired. Suddenly, a loud buzz is heard and he looks around. A phone is vibrating on the table. He goes over and picks it up, looking at the message he just received. He then sits down, and begins to decode the message onto a new sticky note. The message reads "Sarah Williams". He then puts it up on his wall. The scene then jumps to a woman doing her gardening. All of a sudden, the killer appears, and kills her. He returns home, and the scene somewhat repeats itself.
Although it seems long, when condensed, the film time should not be too much. We may cut some things to shorten the scene. We'll have to see when we get to editing.
Mise En Scene and Set design.
As my house was the shooting location, I took up the role of set design and Mise En Scene. Here are some pictures of what I did.


I set cleared up the area where we were filming, and added a few props like a fruit bowl to make it seem more "homely"

I added fake blood to a selection of "killer knives" that I found in the kitchen.

I got some post-it notes to stick up on the wall. These notes create context about the killer, and show he is organised.

I added a bloody effect with knives and hot water to a bowl in the sink.

I bought some bin bags to give the set a little extra context...where the killer keeps his stained clothes!


I improved a "blood pouch" for Mark to conceal in his hand for the stabbing scene.

I added some special lighting by using a lamp to reflect off a white surface.
Subscribe to:
Posts (Atom)